
A step-by-step guide for updating software.
- Connect device to a power source.
- Connect device to internet. The Sentia analyzer can only check for software updates when connected to internet (via Wi-Fi).
- If a software update is available, an "i" for install will appear on the device Home screen, top left-hand side. *
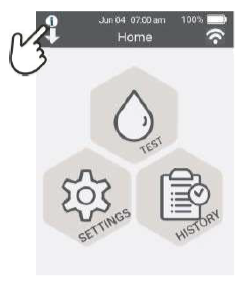
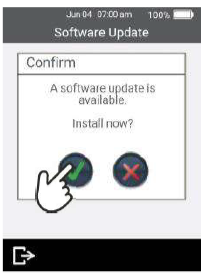
- Touch the "i" icon and permit the new update by pressing

* Note: upon Wi-Fi connection it may take your device some time to recognize that a new software version has become available.
If you are still seeing no software update information after ~1 hour, try turning the device off/on again, then repeat steps.
Option 2: Manual Software Update
(Available in Sentia software versions 2.3.1.533 and above)
-
Connect the device to Wi-Fi and a power source.
-
Go to Settings -> About -> Software Update from the Home screen.
-
Tap the Refresh icon at the bottom right of the screen. This will prompt the device to immediately check for available updates and download any new versions found.
-
Once the download is complete (you’ll see the status change from “Idle” to “Downloading”, then back to “Idle”), return to the Home screen and wait for the "i" icon to appear, indicating that the new software is ready to install.
-
When the "i" icon appears (usually 1–2 minutes after the download completes), tap the icon and select
 on the installation pop-up to complete the update - as outlined in steps 3–4 of the Automatic Method above.


![]()
Troubleshooting software installation issues:
If your device cannot find a new software update available, you may have a Wi-Fi issue.
For troubleshooting Wi-Fi issues see HERE.
If you cannot complete a software update due to a 20-22 Software update failed warning, you may have insufficient storage space on your device to complete a new update.
For troubleshooting a Warning 20-22 issue see HERE.